
Login
ClassLink Login
As of November 28th, 2022 all staff authenticate via ClassLink.
Infinite Campus Portal (Direct) Login
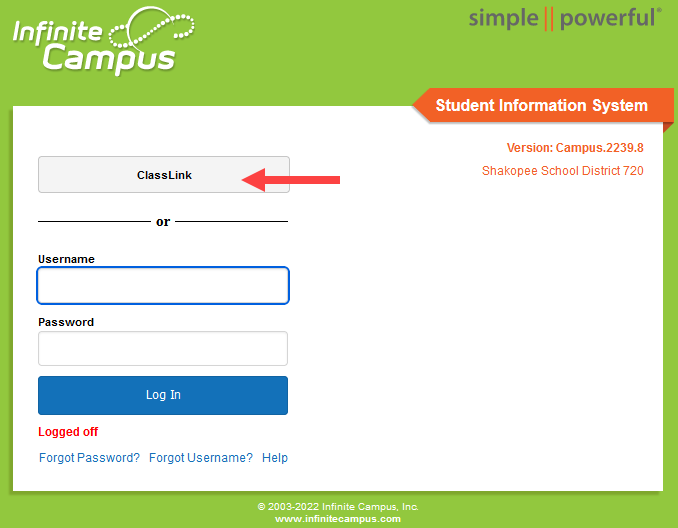
Access portal at: https://shakopeemn.infinitecampus.org/campus/shakopee.jsp
Click ClassLink button
 |
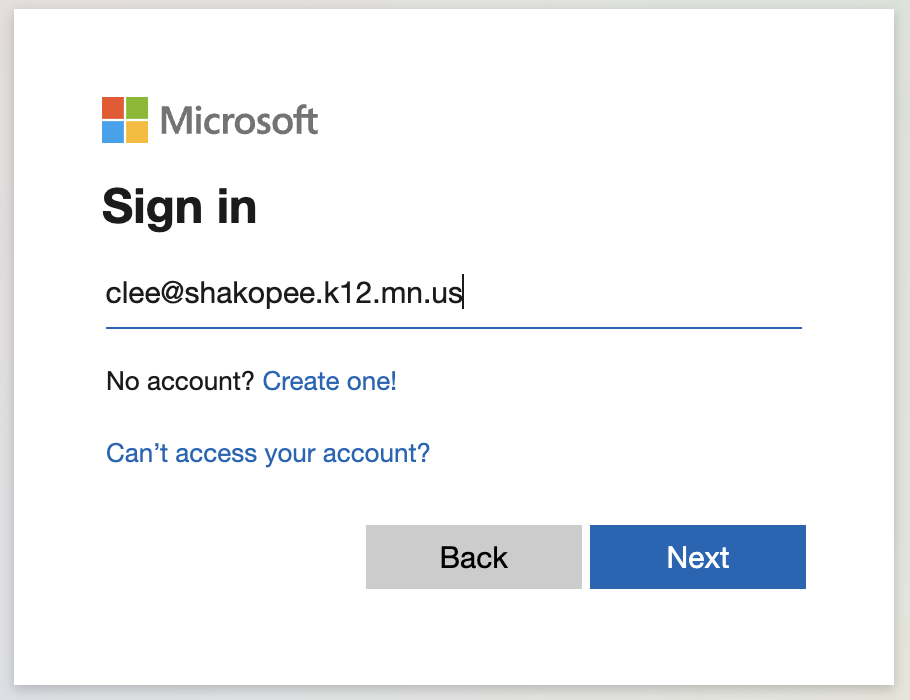
Login is handled by ClassLink and you will sign in with you K12 email address.
 |
 |
ClassLink LaunchPad already signed in..
Will magically allow in to Infinite Campus without additional login prompts.
ClassLink LaunchPad
Login to ClassLink LaunchPad: https://launchpad.classlink.com/Shakopee
Select Infinite Campus app 
Staff
Communication
Employee Self Service
My Food Service
The My Food Service tool allows you to add money to your Food Service account and view your food service account details including purchases, deposits, and adjustments.
Main Menu > Employee Self Service
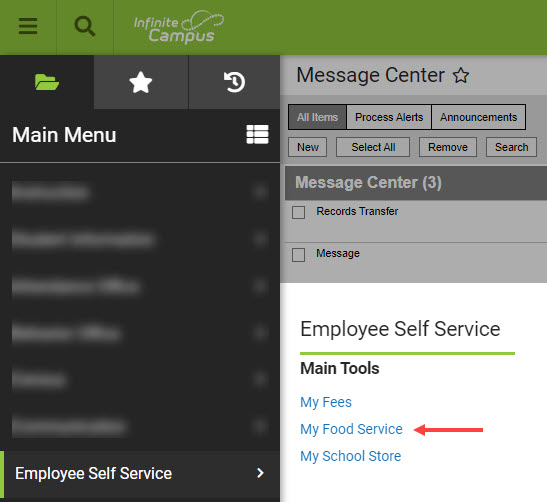
My Accounts
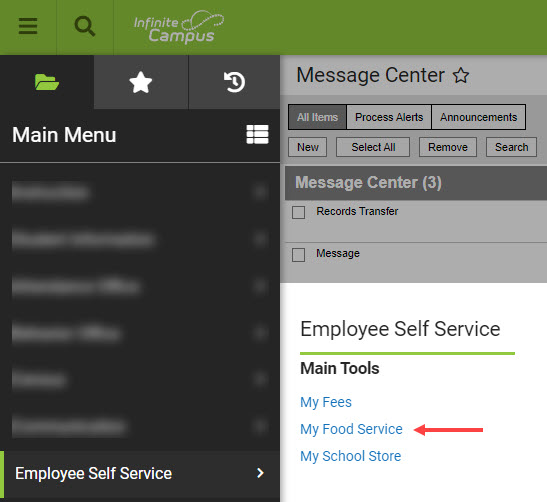
Main Menu > Employee Self Service > My Food Service > My Accounts (upper right corner)

- Click Payment Methods.
- Click New.
- Enter a Nickname for the card.
- Optional: Select Use as Default Payment Method to make this your default payment method.
- Select Card.
- Enter the required card and billing information.
- Click Save.
If you entered something in error, changes cannot be made. Instead, delete the card and re-enter everything as a new Payment Method.
Add a bank account
- Click Payment Methods.
- Click New at the bottom of the screen.
- Select the US bank account option and select one of two options:
-
Automatic bank validation
- Search for and select your bank. A secure payment vendor screen will open.
- Carefully follow the on-screen prompts to link your bank account to complete the payment process.
- During this process, users must add their bank login credentials.
-
Enter bank details manually.
- Click Enter bank details manually.
- Enter your routing and account numbers.
- Click Submit.
- If you would like to save the bank account with Link, enter your email address and click Save with Link. If not, click Not now.
- After you receive an initial email confirming you signed up to have the school debit your bank account, you will get a follow-up email within 1-2 business days to verify your bank account through micro-deposits. Click the back button to return to the Payment Method side panel.
-
Automatic bank validation
- Enter all required information.
- Click Save. This bank account will then be listed as ACTION REQUIRED and cannot be used until the account has been verified.

- To verify the account, you can find instructions in the email you received, or you can log into your bank account, locate the micro-deposit, and find the 6-digit code in the statement descriptor for that deposit. The account can be verified through the email, or you can return to Campus to verify the account by entering the 6-digit code:


Delete a payment method
- Click My Accounts.
- Select Payment Methods.
- Click View for the payment method that will be deleted.
- Click Delete. A Confirm Delete message will appear.
- Click Delete. A Deletion Successful message will appear.
Teachers
Instruction (ie Attendance, Bus, Gradebook, Seating, etc)
Bus Info
Student Information > Reports > Bus Info
Will open in a new tab that can be exported using Excel or Adobe


DRA Assessment Entry
Instruction > Classroom 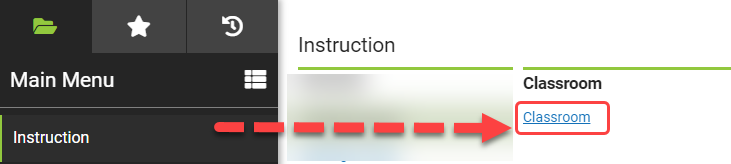
Select Language Arts from the dropdown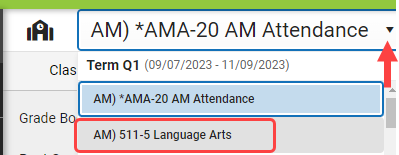
Grades > Standardized Test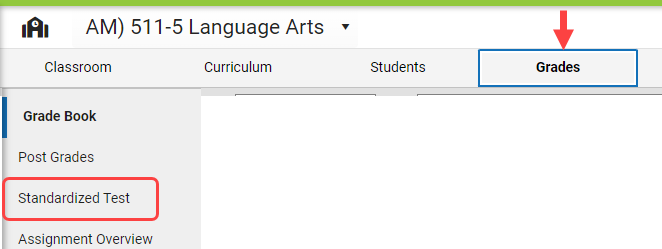
Select Assessment from dropdown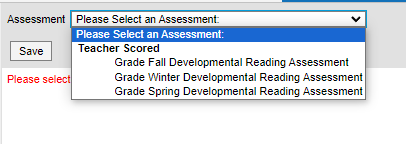
Enter Scores > Save (*Note if the score field is greyed out the assessment window is not open)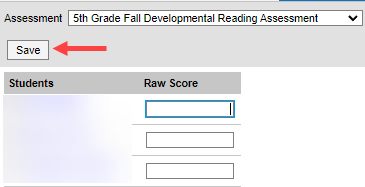
ELEM MCCC Tasks
Instruction > Grades > Post Grades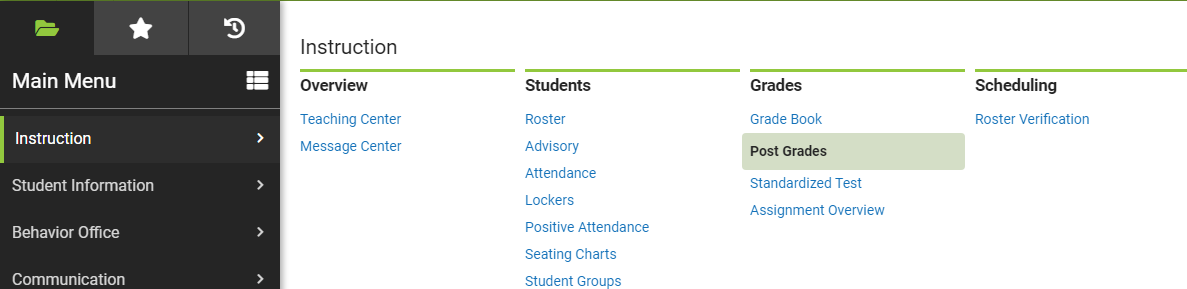
Select your Subject area Section (Language Arts, Mathematics, Social Studies, Science, Health, Personal Growth, Phy Ed, Music or Art) > Select MCCC Final Enrollment Grading Task. Quarter 4 only!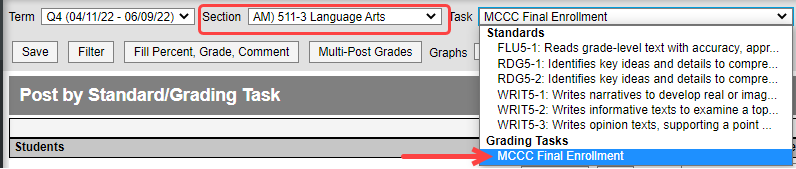

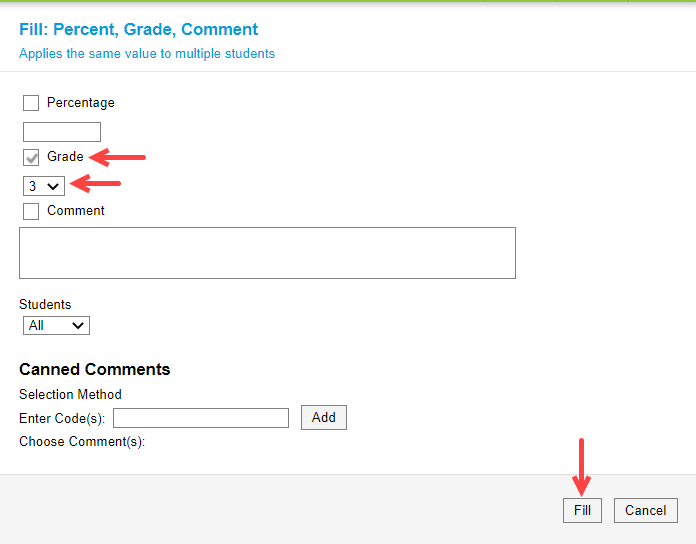
Click Fill Percent, Grade, Comment

Select Grade > Enter 3 > Click Fill
Grading Dropped/Withdrawn students
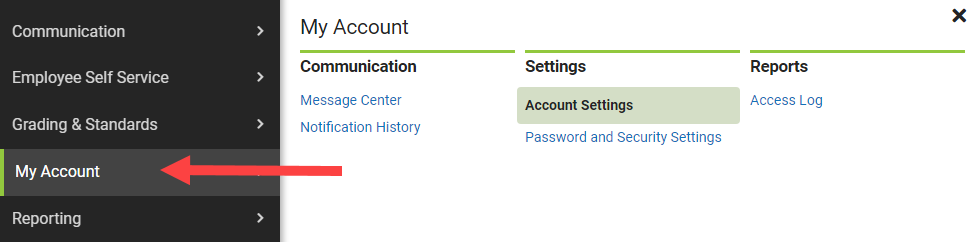
My Account > Account Settings
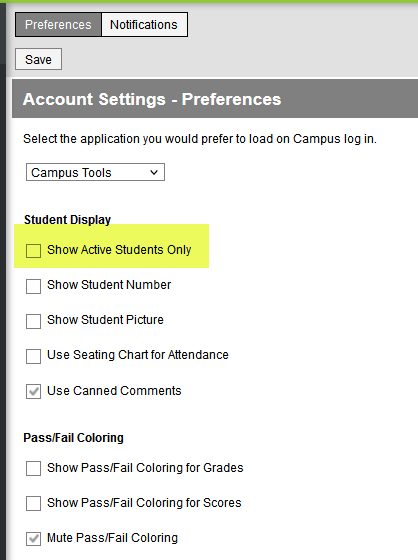
Uncheck Show Active Students Only
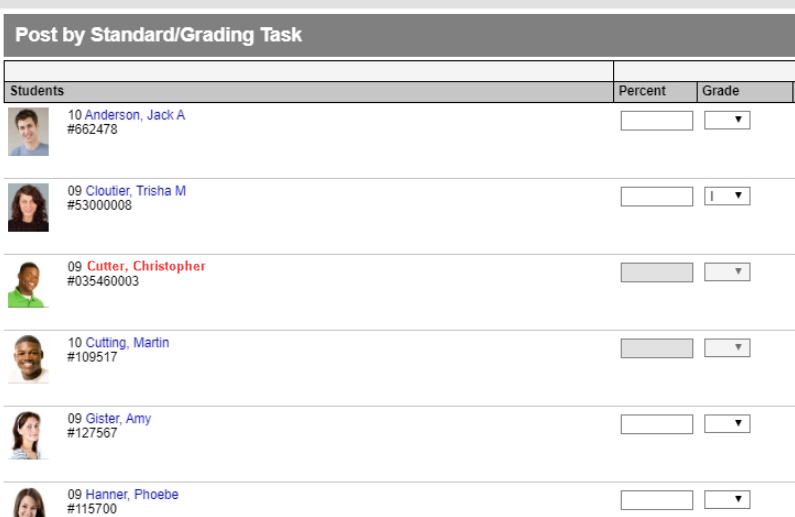
Dropped students display red and are available for grading
Additional Resources
Post/Submitting Grades
Instruction > Grades > Post Grades
Fill Options
Instead of entering grades individually for each student, you can you the Fill tool.
Click Fill Percent, Grade, Comment to open window

Enter Percentage, Grade and/or Comment
Select which students you want to fill, all or empty
Fill
**Note we do not use canned comments at the Elementary level
Elementary MCC Grading Tasks
Select Term (Q1 for example) at the top of the screen. Choose the subject that you be submitting grades for in the Section menu. Then select the Task. Each Task is a standard. Grade your students on their performance for each standard: Incomplete Evidence, 1, 2, 3, or Exceeds.
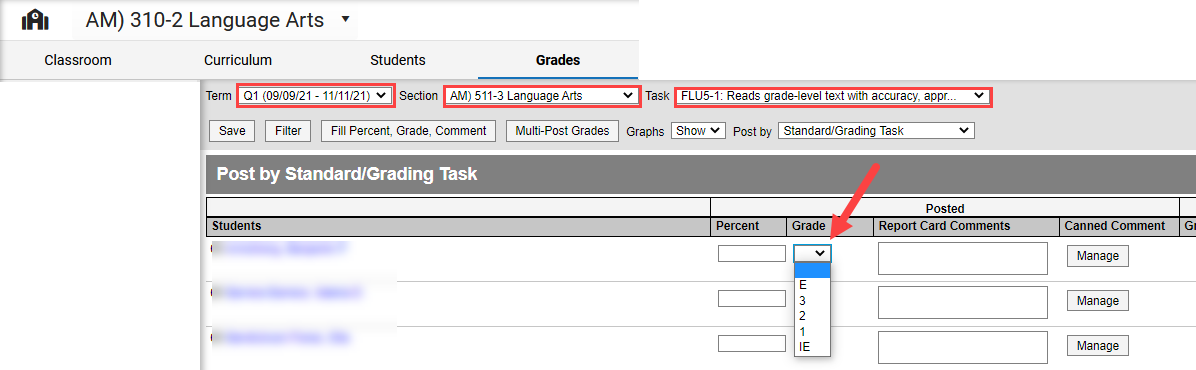
For reference- Elementary Grading Scale
.png)
3. After grading a standard, click Save. Repeat this process for all tasks.

**Fill Options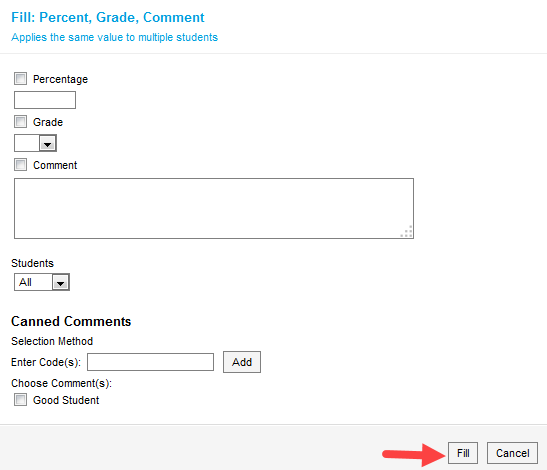
Select Grade checkbox > Enter Grade. Select which students whose grades you want to fill, all or only where fields are empty. Click Fill when finished. Can also be used for Comments. No Canned Comments at the elementary level.
Secondary
Secondary teachers will enter the grade total they see in Canvas into Infinite Campus. The easiest way to look at grades in Canvas and enter them in Infinite Campus is using split view so you can view both gradebooks at the same time.
Select Term (Q1 for example) at the top of the screen. Choose the course that you be submitting grades for in the Section menu. Then select the Task.

Which Task should you use?
Term Grade: Semester-long courses that are not completed at the end of quarter will submit a term grade (i.e. English 8 after Q1 is over). Quarter-long middle school courses must also complete a term grade. Quarter-long high school courses do not need to enter a term grade.
Final Grade: Use when the course is completed. For quarter-long courses, enter the final grade at the end of the quarter. For semester-long courses, enter the final grade at end of semester. For year-long courses, enter the final grade at end of the year.
Assign each student a grade. Select a grade A-F, P/F, or Incomplete.* Optionally, MS teachers may want to enter the overall percent the student earned to use Infinite Campus to calculate a final grade (average) if your class spans more than a quarter. Enter comments if you would like. Click CC to select from a list of "canned comments" you can use. Make sure to click “Save” when grades are completed.
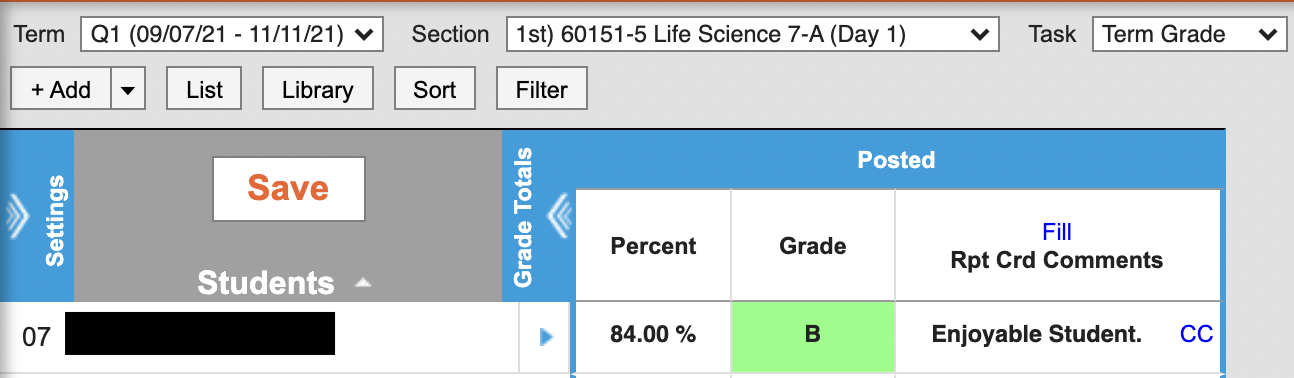
*Incomplete grades are typically due two weeks after the end of quarter unless otherwise stipulated by your building. Teachers should refer to this article if they want students to have access to Canvas assignments/quizzes after the quarter officially ends.
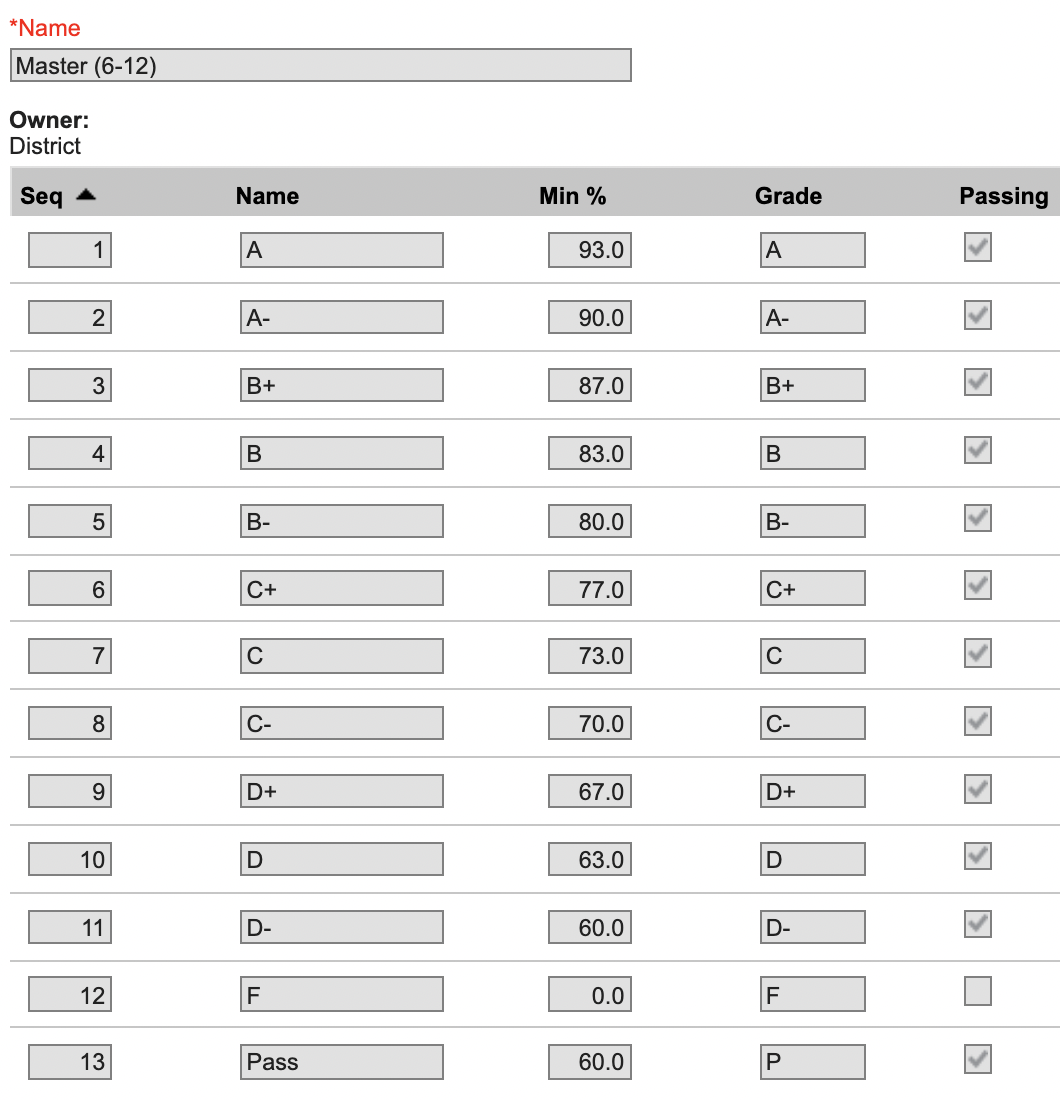
Here is the grading scale for your reference:
Repeat this process for each section/period you teach. Be sure to click Save after each section has been graded!
Additional Resources
Seating Chart
**If teaching at multiple schools, verify you are on the correct School > Calendar

Creating Seating Charts - Video
Instruction > Students > Seating Charts > New

Add seats to the layout. Add them individually by clicking Add Seat, or click Add Seat Grid to add multiple seats in a grid pattern
Rearrange seats as desired to fit the layout of your room. Keep in mind that desks cannot overlap. Use the + and- buttons at the top left to zoom in or out of your chart

Click and drag a seat by clicking the six-dots icon at the
bottom left and dragging it where you want it. Your cursor
displays as a hand when you hover over this icon

Or click the 4-arrows icon to use the arrows on your keyboard to move the seat. You can also click the arrow options that display. Tap the space bar to place the seat.
Once the seats are arranged how you want them, go to the Students tab. You can returnt to the Layout tab at any point to adjust seats
Place students individually from the Unseated Students by clicking the six-dots icon and dragging the student to an empty seat. Or Auto-place Unseated Students using the dropdown at the top. Students can be placed randomly, alphabetically by name, by student number, or by birthdate.
**If you click and drag a student to a seat that is already filled, the students swap places
Save
Print Seating Chart
Print
In the report editor that displays, indicate the Orientation of the printed chart and what student data should Show
Click Print
A PDF version of the printed chart opens in a new browser tab
Tip: If the chart exceeds the printable area of the page, consider using the "Shrink to Page" or "Fit to Page" setting in your browser's print options
Copy a Seating Chart
Click Copy
Edit the Name of the chart and Set as Primary if desired
Select a School Year. Select the same school year to copy this chart layout to another period
Select a Destination Section for the copied chart
Click Copy
The chart is copied to the destination section. If any students are the same between the two sections, their placements are kept.
To view and edit the copied chart, switch to that section.
Related Articles
Student Information
Check Back
Check back as we update this section
Communications
**It is important to have your name and or class information somewhere in the Message Subject or Body. The message is sent via a generic Messenger and parents/guardians see a donotreply email address NOT your school email.
Employee Self Service
My Food Service
The My Food Service tool allows you to add money to your Food Service account and view your food service account details including purchases, deposits, and adjustments.
Main Menu > Employee Self Service > My Food Service
My Accounts
Main Menu > Employee Self Service > My Food Service > My Accounts (upper right corner)
- Click Payment Methods.
- Click New.
- Enter a Nickname for the card.
- Optional: Select Use as Default Payment Method to make this your default payment method.
- Select Card.
- Enter the required card and billing information.
- Click Save.
If you entered something in error, changes cannot be made. Instead, delete the card and re-enter everything as a new Payment Method.
Add a bank account
- Click Payment Methods.
- Click New at the bottom of the screen.
- Select the US bank account option and select one of two options:
-
Automatic bank validation
- Search for and select your bank. A secure payment vendor screen will open.
- Carefully follow the on-screen prompts to link your bank account to complete the payment process.
- During this process, users must add their bank login credentials.
-
Enter bank details manually.
- Click Enter bank details manually.
- Enter your routing and account numbers.
- Click Submit.
- If you would like to save the bank account with Link, enter your email address and click Save with Link. If not, click Not now.
- After you receive an initial email confirming you signed up to have the school debit your bank account, you will get a follow-up email within 1-2 business days to verify your bank account through micro-deposits. Click the back button to return to the Payment Method side panel.
-
Automatic bank validation
- Enter all required information.
- Click Save. This bank account will then be listed as ACTION REQUIRED and cannot be used until the account has been verified.
- To verify the account, you can find instructions in the email you received, or you can log into your bank account, locate the micro-deposit, and find the 6-digit code in the statement descriptor for that deposit. The account can be verified through the email, or you can return to Campus to verify the account by entering the 6-digit code:
Delete a payment method
- Click My Accounts.
- Select Payment Methods.
- Click View for the payment method that will be deleted.
- Click Delete. A Confirm Delete message will appear.
- Click Delete. A Deletion Successful message will appear.
My Account
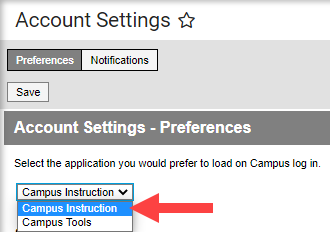
Setting Instruction as Landing Page
My Account > Account Settings
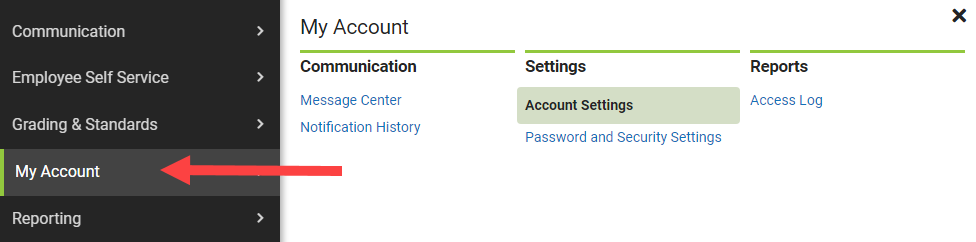
Select Campus Instruction > Save
Reporting
Grades Report
The Grades Report provides a view of selected students in a section and their posted grades on selected tasks and standards. This report collects posted grades only, not In-Progress grades.
Generating the Grades Report
- Select the Term and Section for which you want to view student grades. Select multiple sections if desired. The Report Options and Student list will include data from all selected sections.
- In the Display section, leave the Term Dates and Section Dates checkboxes marked to include those dates in the report.
- Indicate how records in the report should be Grouped, by Course/Section (applicable when selecting multiple Terms) or by Student.
- Select which Term(s) to include in the report.
- Select Standards and/or Grading Tasks to include them in the report.
- Leave the Student checkboxes marked to select students to include in the report. Filter the student list by entering a Student Group if desired.
- Click Generate PDF to view the report in PDF format or click the arrow button next to Generate to select a different format (DOCX or CSV).


Admins
Communications
Messenger 2.0
Grades
Grading by Student
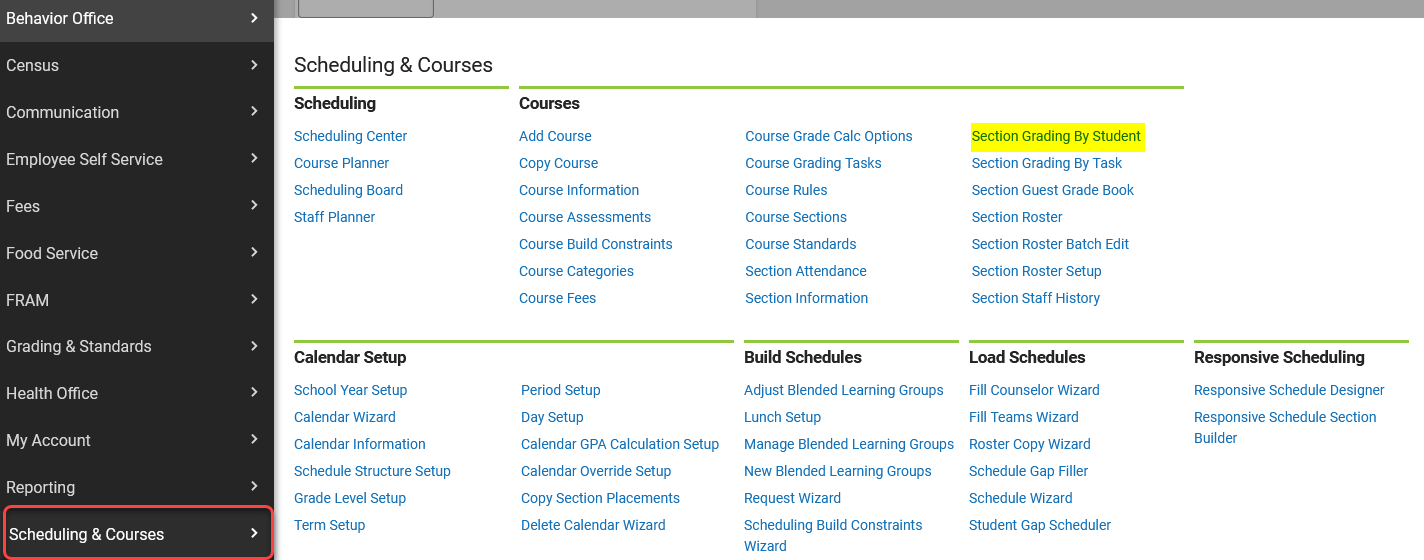
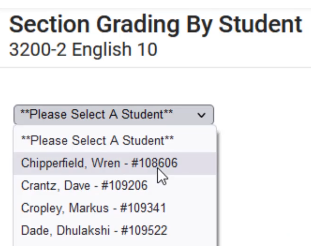
Allows for scores to be entered for students in a selected course section. Useful for multiple tasks in a single subject
Courses > Section > Section Grading by Student
Select Student
Enter Score
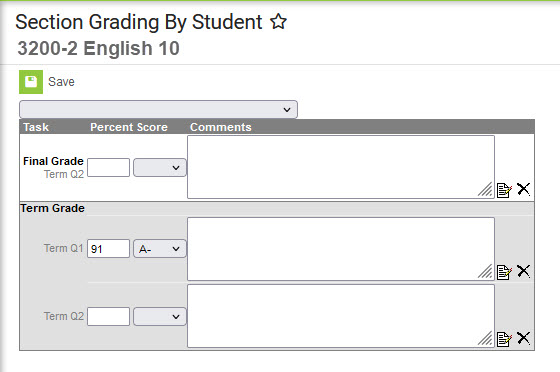
Save
Repeat process as necessary
Grading by Task (Section)
Allows for scores to be entered for grading tasks in a selected course section. Useful for grading multiple students in one single task.
Scheduling & Courses > Section Grading By Task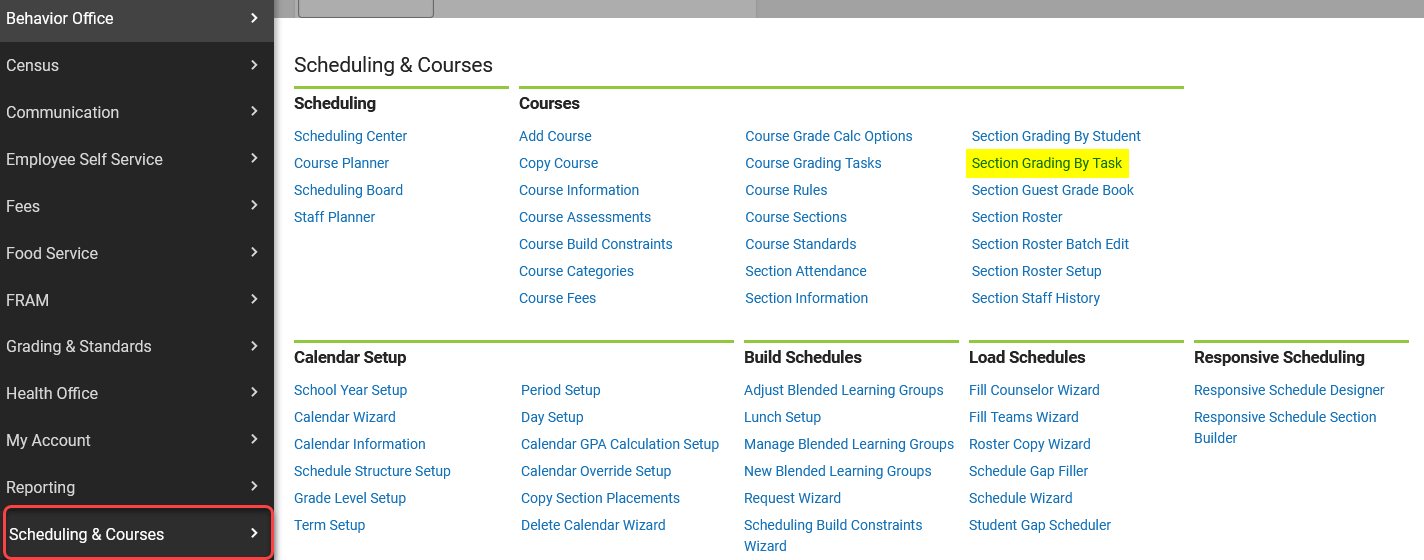
Open Section
Search for Course/Section to enter grade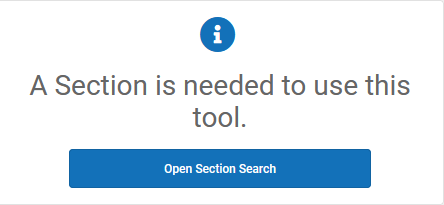
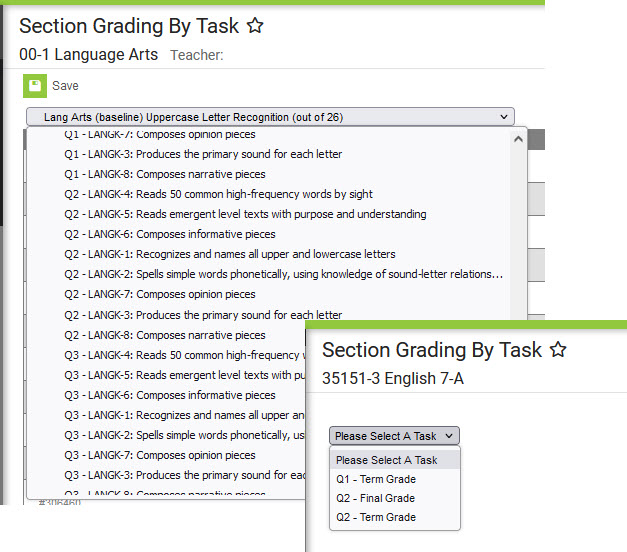
Select A Task
Enter Percent and/or Score
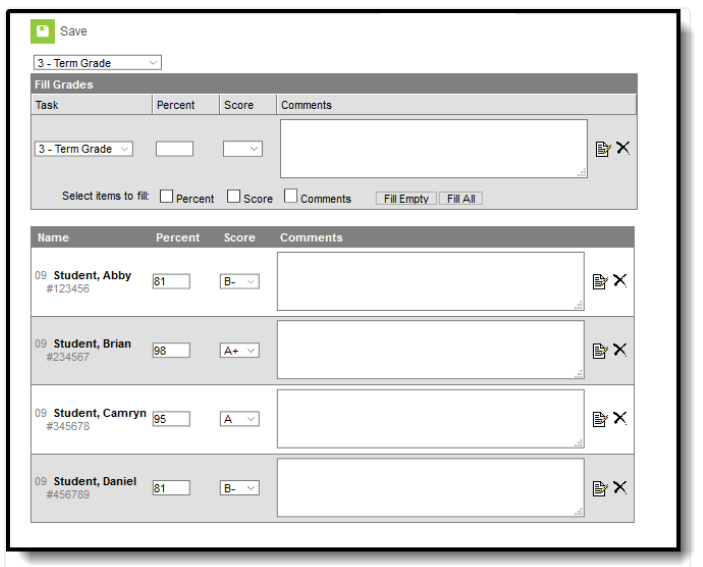
Save
Repeat process as necessary
Employee Self Service
My Food Service
The My Food Service tool allows you to add money to your Food Service account and view your food service account details including purchases, deposits, and adjustments.
Main Menu > Employee Self Service
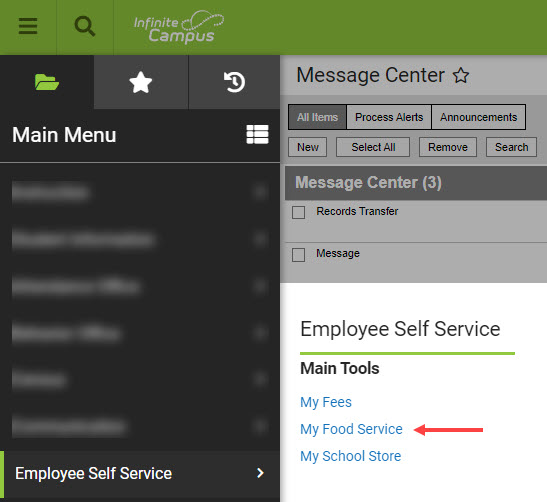
My Accounts
Main Menu > Employee Self Service > My Food Service > My Accounts (upper right corner)
- Click Payment Methods.
- Click New.
- Enter a Nickname for the card.
- Optional: Select Use as Default Payment Method to make this your default payment method.
- Select Card.
- Enter the required card and billing information.
- Click Save.
If you entered something in error, changes cannot be made. Instead, delete the card and re-enter everything as a new Payment Method.
Add a bank account
- Click Payment Methods.
- Click New at the bottom of the screen.
- Select the US bank account option and select one of two options:
-
Automatic bank validation
- Search for and select your bank. A secure payment vendor screen will open.
- Carefully follow the on-screen prompts to link your bank account to complete the payment process.
- During this process, users must add their bank login credentials.
-
Enter bank details manually.
- Click Enter bank details manually.
- Enter your routing and account numbers.
- Click Submit.
- If you would like to save the bank account with Link, enter your email address and click Save with Link. If not, click Not now.
- After you receive an initial email confirming you signed up to have the school debit your bank account, you will get a follow-up email within 1-2 business days to verify your bank account through micro-deposits. Click the back button to return to the Payment Method side panel.
-
Automatic bank validation
- Enter all required information.
- Click Save. This bank account will then be listed as ACTION REQUIRED and cannot be used until the account has been verified.
- To verify the account, you can find instructions in the email you received, or you can log into your bank account, locate the micro-deposit, and find the 6-digit code in the statement descriptor for that deposit. The account can be verified through the email, or you can return to Campus to verify the account by entering the 6-digit code:
Delete a payment method
- Click My Accounts.
- Select Payment Methods.
- Click View for the payment method that will be deleted.
- Click Delete. A Confirm Delete message will appear.
- Click Delete. A Deletion Successful message will appear.
Student Information
Web Filtering
Timing
Updates to student filtering only occur once a day over the evening. Changes made during school day will not reflect until following day.
These are steps for setting the Internet filtering level via Infinite Campus. This is to be done only at the direction of building administration or designee.
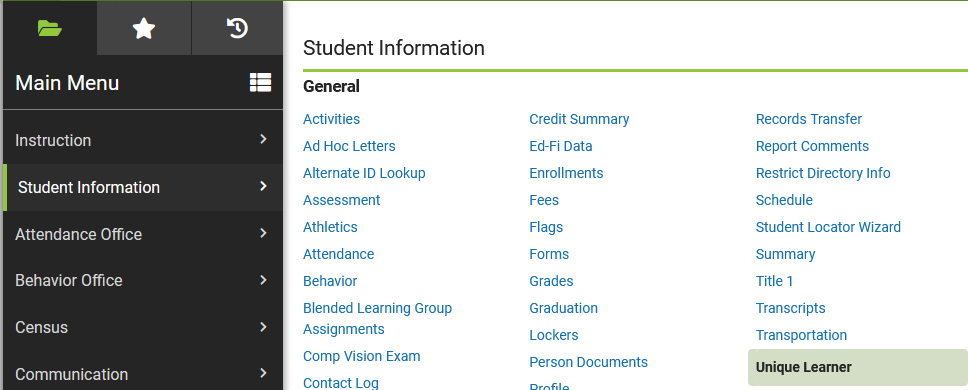
Locate Unique Learner Tool under Student Information > Unique Learner
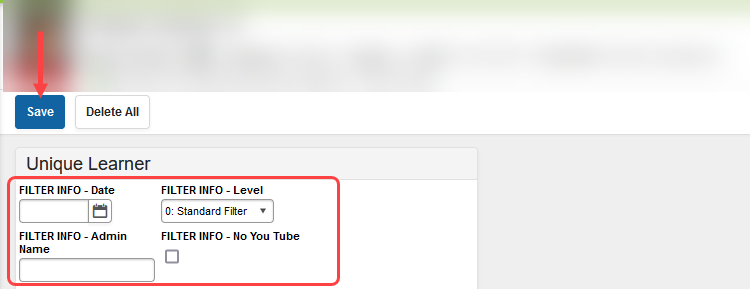
Enter ALL filter info fields > Save
Content Filtering - Filtering Levels
Office Assistants
Infinite Campus 2.0
Information is organized per Menu\Tool design as displayed in Infinite Campus 2.0.
Employee Self Service
My Food Service
The My Food Service tool allows you to add money to your Food Service account and view your food service account details including purchases, deposits, and adjustments.
Main Menu > Employee Self Service
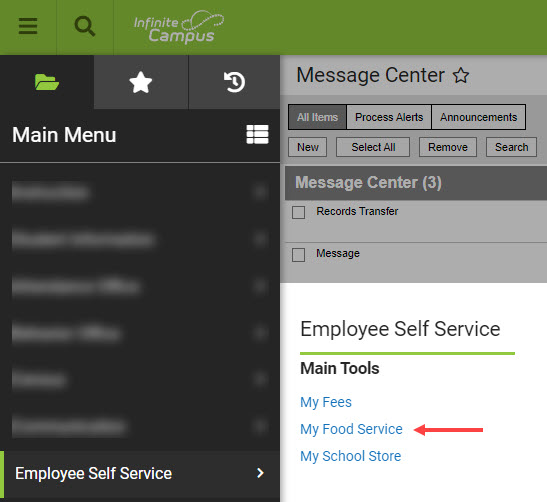
My Accounts
Main Menu > Employee Self Service > My Food Service > My Accounts (upper right corner)
- Click Payment Methods.
- Click New.
- Enter a Nickname for the card.
- Optional: Select Use as Default Payment Method to make this your default payment method.
- Select Card.
- Enter the required card and billing information.
- Click Save.
If you entered something in error, changes cannot be made. Instead, delete the card and re-enter everything as a new Payment Method.
Add a bank account
- Click Payment Methods.
- Click New at the bottom of the screen.
- Select the US bank account option and select one of two options:
-
Automatic bank validation
- Search for and select your bank. A secure payment vendor screen will open.
- Carefully follow the on-screen prompts to link your bank account to complete the payment process.
- During this process, users must add their bank login credentials.
-
Enter bank details manually.
- Click Enter bank details manually.
- Enter your routing and account numbers.
- Click Submit.
- If you would like to save the bank account with Link, enter your email address and click Save with Link. If not, click Not now.
- After you receive an initial email confirming you signed up to have the school debit your bank account, you will get a follow-up email within 1-2 business days to verify your bank account through micro-deposits. Click the back button to return to the Payment Method side panel.
-
Automatic bank validation
- Enter all required information.
- Click Save. This bank account will then be listed as ACTION REQUIRED and cannot be used until the account has been verified.
- To verify the account, you can find instructions in the email you received, or you can log into your bank account, locate the micro-deposit, and find the 6-digit code in the statement descriptor for that deposit. The account can be verified through the email, or you can return to Campus to verify the account by entering the 6-digit code:
Delete a payment method
- Click My Accounts.
- Select Payment Methods.
- Click View for the payment method that will be deleted.
- Click Delete. A Confirm Delete message will appear.
- Click Delete. A Deletion Successful message will appear.
Grades
Grading by Student
Allows for scores to be entered for students in a selected course section. Useful for multiple tasks in a single subject
Courses > Section > Section Grading by Student
Select Student
Enter Score
Save
Repeat process as necessary
Grading by Task (Section)
Allows for scores to be entered for grading tasks in a selected course section. Useful for grading multiple students in one single task.
Scheduling & Courses > Section Grading By Task
Open Section
Search for Course/Section to enter grade
Select A Task
Enter Percent and/or Score
Save
Repeat process as necessary
Photo upload
A picture cannot be deleted or removed; you must replace the photo. If you do not have a current or correct photo, a replacement picture can be used. A Portrait Place Holder (located in your schools ClassLink School Pictures folder) or a photo taken on a phone are both options. Keep in mind that if this photo is incorrect in the Shared Google Drive, the original downloaded from the photography company (the source of the picture) is incorrect and needs to be corrected.
Census > Demographics > Click Upload Picture
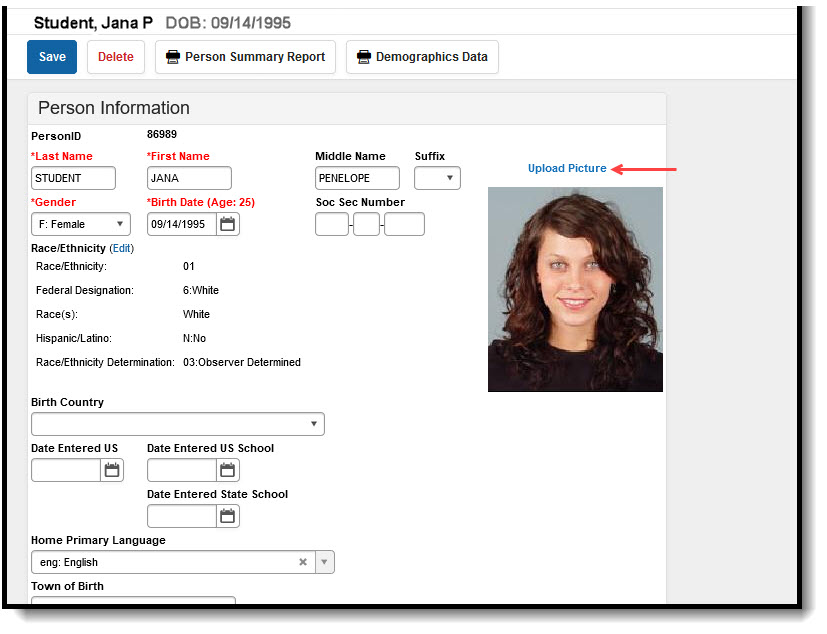
Click Browse > Browse to the location of the saved picture
Click Upload
Portal Assistance
Reset Password
Reset Password
Search > (Type) User > Last Name, First Name OR Portal Username - search results are more successful when not typing entire names, stick to a few letters
From Search results Click User Account > Reset Password

Type in new password using a default or one-time password > Reset Password > Save
IC requires a strong password and will not give the option to Reset Password until a strong password is entered.(GREEN)

Resetting the password automatically checks the Force Password Change

Reset Username
Usernames can be updated for Guardians that may want to have something more personal or may be having difficulty remembering their login info.
Search > (Type) User > Last Name, First Name OR Portal Username - search results are more successful when not typing entire names, stick to a few letters
From Search results Click Username

Remove and Enter new Username > Save

View Access Log
Search > (Type) User > Last Name, First Name OR Portal Username - search results are more successful when not typing entire names, stick to a few letters
From Search results Click Username > Log and Summaries

Will show Timestamp and Success

Records Request
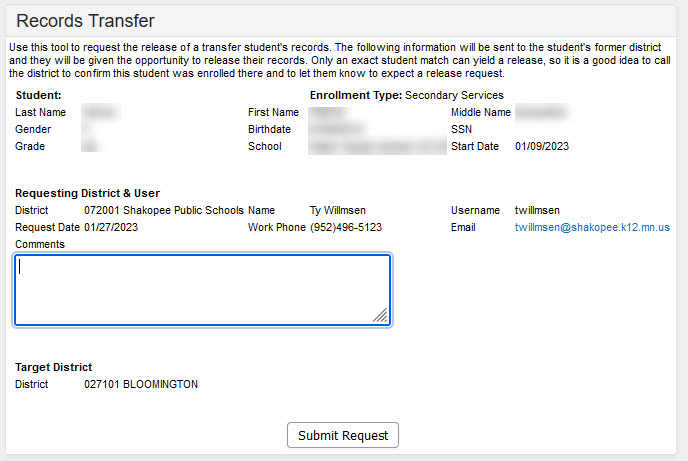
The Records Transfer tab is one part in the District to District records transfer process provided within schools that use Infinite Campus SIS. This process provides a method to electronically share data between two districts.
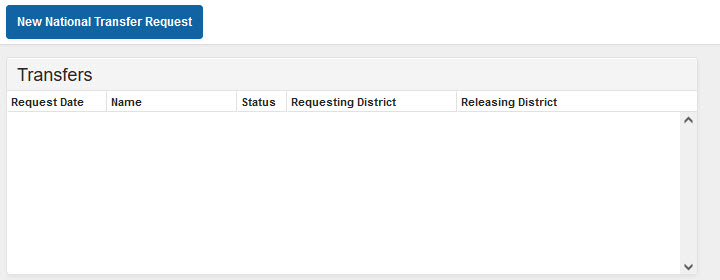
Initiate a New National Transfer Request
Student Information > General > Records Transfer
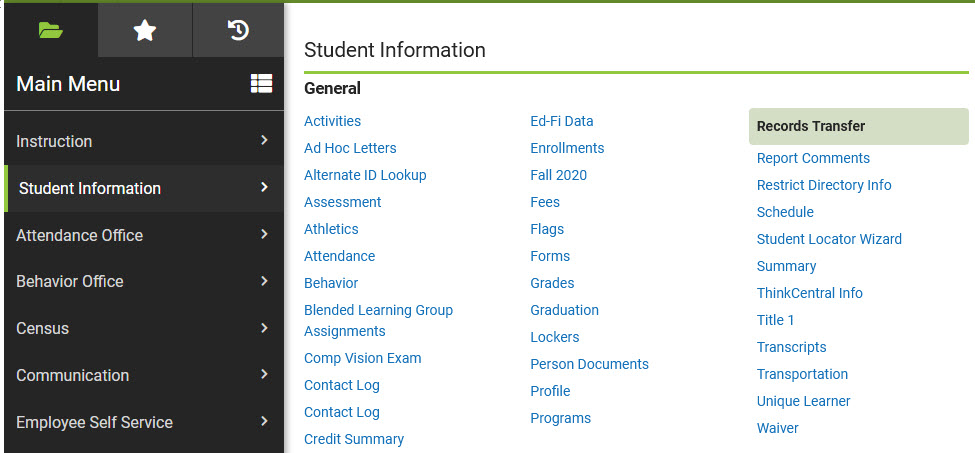
New National Transfer Request
Enter info to Search for participating district
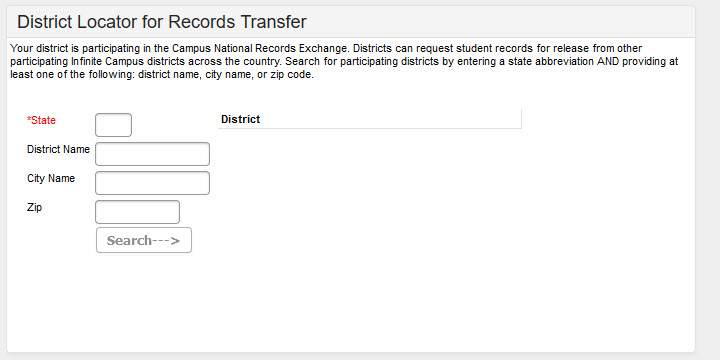
Select District Name from list
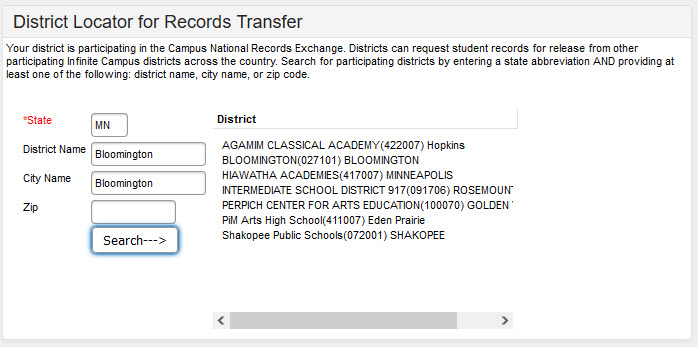
Enter a comment if needed > Submit Request
Unload Course Requests
When completed, the student’s schedule displays No Schedule Course for the terms where scheduled coursed were unloaded.
Student Information > Schedule > Walk-in Scheduler
Click the arrow > Unload
Uncheck any terms you need to KEEP > Unload
Semester Courses need to be kept together i.e. Q1/Q2 or Q3/Q4


Infinite Campus Community
The Campus Community provides a single sign-on access from the Campus system to the knowledge base, forum discussions, learning tools, support site, upcoming changes.
Infinite Campus Shortcut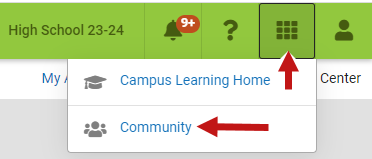
Create a Community account
Security
Protection of information in Infinite Campus is protected by both Infinite Campus and Shakopee Schools.
Below are some of the features in use (as of November 28th, 2022):
-
Infinite Campus Security Measures
- Login notice
- Prohibited Passwords
- Shakopee Schools
- ClassLink LaunchPad authentication only
FAQ
Login
Parent account no longer works with switch to ClassLink.
Cause: Commonly caused by using staff account to access student info
Resolution: Open helpdesk ticket requesting code to setup parent account following instructions found on Infinite Campus Parent Web Portal (https://techtools.shakopeeschools.org/117023-infinite-campus/infinite-campus-parent-web-portal)
Security: User does not have rights to selected Calendar
Error:
Security: User does not have rights to selected Calendar
District: Shakopee School District 720 - MN (shakopee) appServer c840mn-cmb001
Date: Sep 5, 2023 9:24:57 AM
Error Token: 40018075
Typical fix:
Clear browser cache. This can be done for just site.
Directions can be found on Google Chrome - Cache issues page under Clear Single Site Cache tab.
Navigation
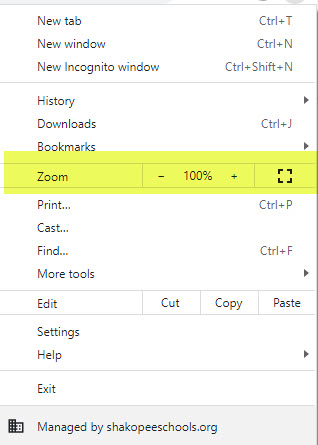
New Look main menu navigation app missing
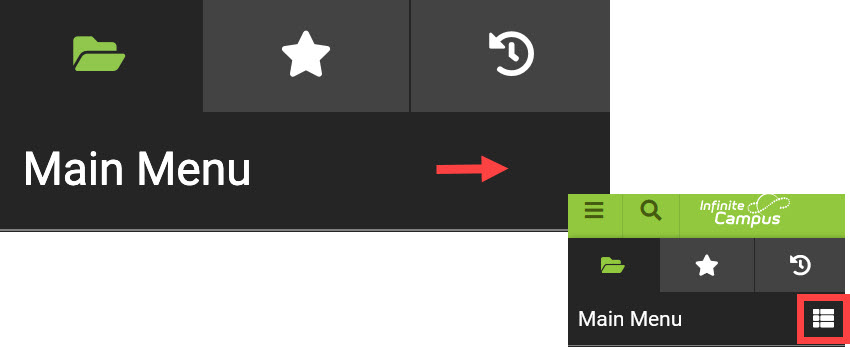
Change your Zoom settings back down to 100%
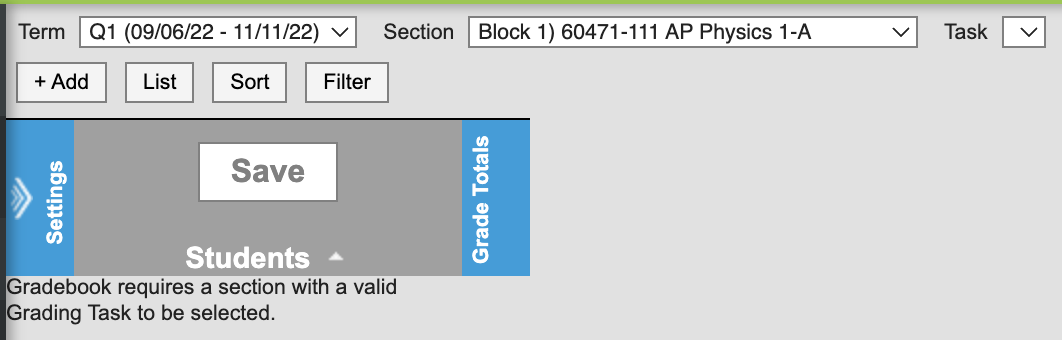
Instruction (ie Gradebook, Seating, etc)
Gradebook requires a section with a valid Grading Task to be selected.
Cause: Section does not have an assigned grading task.
Resolution: Contact the Scheduling Administrator in the building
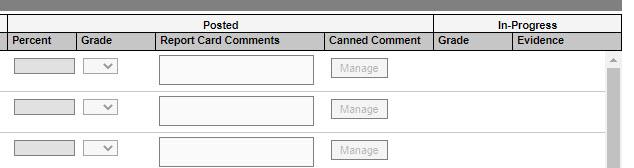
Gradebook Percent, Grade and Report Card Comments are greyed out
Cause: Grading Window is Closed to post grades or comments
Resolution: Contact the Registrar or Front Office Staff to open
Missing Student
Cause: Student is missing from roster
Resolution: Contact Scheduling Administrator in the building