
What is iMovie?
iMovie is an easy to use, yet powerful video editor. You can use it to combine images, videos, and sounds to create professional looking movies or "trailers." The app has transitions, sound effects, and theme music that you can use or you can import it from other sources.
Why is iMovie a great tool?
iMovie is a great tool for creating and editing videos. Using video, students can use their images, videos, voice, and sound effects to create great products for demonstrating learning. Because you can use anything on your camera roll in iMovie, this app is ready-made for creation. When products are finished, they can be shown via AirPlay, uploaded to YouTube, Google Drive, or Canvas/Seesaw.
How do I use iMovie?
-
iPad
-
MacBook
- Add Button
Written Directions
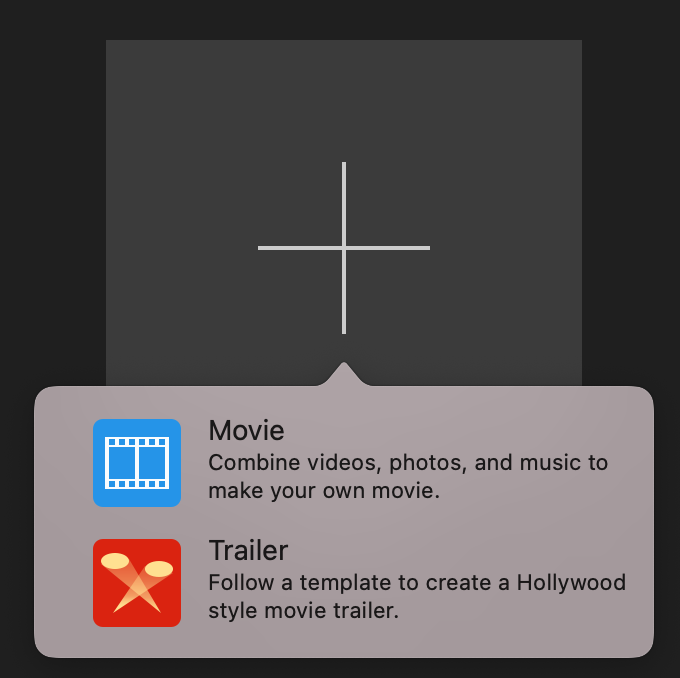
1. When you open iMovie, start by tapping on + Create Project.

2. There are two kinds of projects you can create; Movie or Trailer. Movies are open-ended and customizable and trailers are templates that can be used to create short videos similar to movie trailers.

3. If you select Movie, you can then tap on all the media you want to include in your project. You can always add more media later. The media that appears in this list is what is on your camera roll in the Photos app.

4. This is the main editing screen you'll see in iMovie. The window in the upper-right allows you to add additional media to your project.

5. If you tap the audio button, you'll have options to add limited theme music or sound effects. Because students do not have the iTunes store, they will not be able to use the Playlists, Albums, or Artists buttons. If students are looking for additional music options, they can use the Documents app to download songs from sources such as the YouTube Audio Library. In addition, you can tap on the microphone button on the left to record a voiceover or tap on the camera to take a photo or video. Lastly, you can tap on the wavelength icon on the right (highlighted in blue below). This displays the volume of audio so that you can level out sound effects, music, and spoken words so that they are mixed to a consistent volume.

6. If you tap on an image or video in the timeline editor, a yellow rectangle will appear around the media you are editing. You can use the thicker yellow lines to trim your media down or make it longer. There are also a number of actions along the bottom of the screen that you can perform. You can split (or divide) media, which is useful in clipping out parts you don't want in your project. You can adjust the speed of videos, change the volume of videos or audio, and add filters.

7. When you click Done, you can edit the name of your movie, preview the final product, share, or delete your video project.In order to use or view your video outside of iMovie, you must press the share button (box with an arrow pointing up) and then tap "Save Video." This can take some time to process your video so do not close the app until the project is complete.
Video Directions
1. Add media to your project.
2. Edit your media files.
3. Edit your audio.
4. Save and export your video.
Written Directions
1. Create a new project. You can choose between a Trailer or Movie.
2. Import your media or drag and drop media onto the timeline editor.

3. Edit you media using the toolbar.
4. Use a two-finger click to get additional editing options such as freeze frames, splitting, cutting, and deleting.

6. Save your video by clicking on the share button in the upper right corner.
Video Directions
Additional Resources:
- Apple Support iMovie Website
- iMovie Trailer Planning Documents
- Using Safari to Download Music and Videos (for projects)
- Royalty Free Music Sources
- Royalty Free Image/Video Sources
- Example: Natural Disasters Project - 5th Grade
- Example: "For My People" - 9th Grade